Fusion 360 Workflows Livestream Series Recap
Recently, we teamed up with Autodesk to host a two-part Fusion 360 livestream series that covered essential tips for working with Fusion 360 in combination with the Bantam Tools Desktop CNC Milling Machine. Like you’ll see in this series, Fusion 360 offers a number of powerful tools that allow you to turn your ideas into reality, collaborate with team members across the globe, and more!
What does the Fusion 360 workflows look like with our Desktop CNC Milling Machine? We like to breakdown the workflow into five general steps:
Step 1: Design your CAD model.
Step 2: Program toolpaths for your model (aka CAM).
Step 3: Generate G-code files.
Step 4: Import your G-code files and setting them up in the Bantam Tools software.
Step 5: Machine your part using the Desktop CNC Milling Machine.
In this series, we take you through each of these steps to offer a clearer understanding of Fusion 360 and factors to consider as you move through this workflow.

Part One: Designing in CAD
In the first part of the Fusion 360 workflows series, we discuss the basics of designing in CAD. Whether you’re machining parts in your professional studio, home workshop, or classroom, taking tool geometry, part features, and the material you’re machining into consideration is essential when creating your CAD model. Doing so will ultimately make it easier for you to program your CAM and, in turn, help you optimize your prototyping or manufacturing process with the Desktop CNC Milling Machine.

Livestream Overview
General Design considerations (13:25)
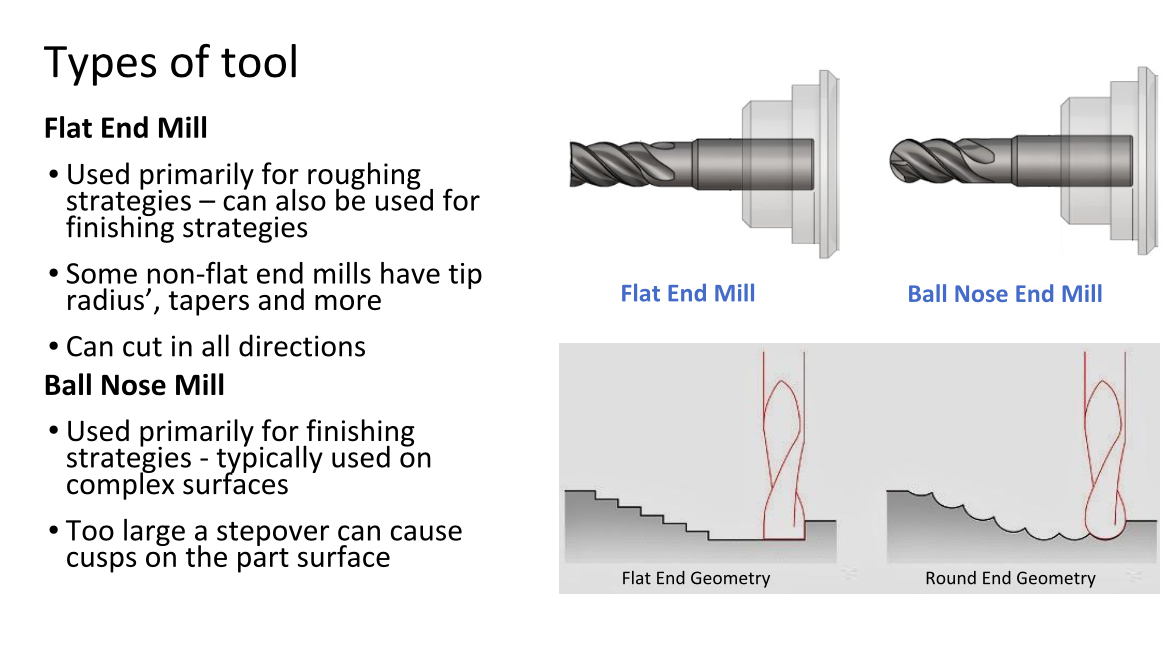
Flat End Mills vs. Ball End Mills (14:56)
Tool Considerations in Design (16:54)
Example Poor Design for Manufacturing (17:38)
Tool Comparison Tool (18:20)
Tool Geometry Considerations (20:58)
CAD Demo (22:14)
Q&A (39:10)
Part Two: Programming CAM & Setting Up a Job in the Bantam Tools Software
Now that you've created your CAD model, it’s time to program your CAM. In part two of this livestream series, we dive into the world of CAM. We discuss the 2D and 3D toolpaths Fusion 360 offers and when to use them. We also give you more insight into how to set up your G-code files in the Bantam Tools software!


PowerPoint Presentation
Programming CAM in Fusion 360 PowerPoint
Livestream Overview
How is a part programmed? (5:49)
Post Processing & Types of Code (10:39)
Setup & Stock in the Manufacturing Workspaces (11:39)
CAM Properties (12:25)
Boundary Selection (13:11)
Heights (13:59)
Rest Machining (15:34)
2D Strategies (17:10)
3D Strategies (18:37)
Fusion 360 Tool Library (19:46)
Machining Parameters (speeds, feeds, stepdown, and stepover) (20:57)
CAM Demo Starts (24:17)
Designing for fixturing (24:50)
Utilizing Stock to Leave (27:46)
Simulating toolpaths and utilizing comparison tool (45:22)
Setting up G-code files in the Bantam Tools software (49:16)
Q&A (1:00:00)
A huge thank you to everyone who was able to join us and for all your questions! As you continue to learn more about Fusion 360 and using it with the Desktop CNC Milling Machine, feel free to reach out via email at resources@bantamtools.com or on Instagram, Twitter, or Facebook.