Use Fritzing to Personalize Your PCB with Text or Image
Did you know you can easily design a PCB in Fritzing and export Gerber files that can be cut on the Bantam Tools Desktop PCB Milling Machine? We have a new support guide that walks you through the steps. Fritzing also has an option to add text or logos onto the silkscreen layer of the board, but because the Bantam Tools Desktop Milling Machine Software doesn't use the silkscreen file, this method won’t work. Even if you place a shape on the top or bottom trace layer, Bantam Tools Desktop Milling Machine Software would treat the shape as a trace and cut around the shape instead of engraving the shape, which is what users usually want.

Instead, you can create an SVG file with the text or logo you want engraved on the board. Here's how:
Note: For this example, we'll start with the same Fritzing file we worked on in our support guide.
Step 1:
First we'll need to move traces around to make room for the text we’ll be adding. They'll still start and end in the same places, just taking a different path. The easiest way to move traces is to click in the middle of a trace segment, making a new node appear. You can then move that node wherever you’d like. Alternately, you can click on a trace, hit “delete” on your keyboard, and start fresh. Clicking on the starting then ending point of the trace creates a new trace, which you can manipulate as you’d like. When you’re finished, export the Gerber files and open them in Bantam Tools Desktop Milling Machine Software.
Step 2:
In Fritzing, select Export for PCB > Etchable SVG, and save to a new folder.
Step 3:
Navigate to that folder and find the the copper_top.svg file.

Step 4:
Open this file in Inkscape, a free graphics application. This will create an SVG with a canvas size that matches your PCB board size.
Step 5:
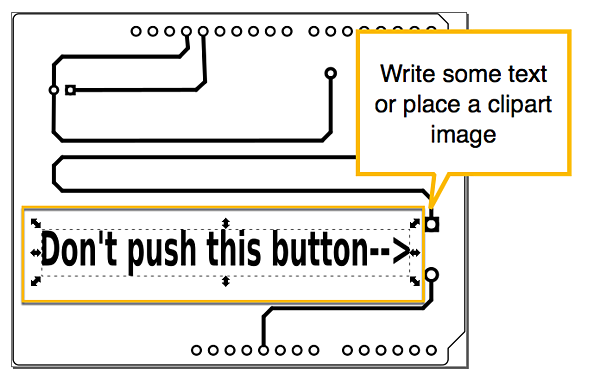
Now you get to decide what design you want engraved on your board! Write some text on your board and move it around to where you want it to engrave.
Step 6:
Select that text; select Path > Object to Path to vectorize the text; and save your file (Ctrl + S).

Select “Path” > “Object to Path”
Step 7:
Confirm that the text is now vectorized by selecting the "Edit Paths By Nodes" tool and clicking on a letter. It should look like the screenshot below, with little gray squares appearing on the letter.

Step 8:
Load this SVG file into Bantam Tools Desktop Milling Machine Software.
Step 9:
Now both your Gerber and SVG files are loaded into Bantam Tools Desktop Milling Machine Software. In the Advanced Tab, select "Scale From Document Bounds." This will place your SVG in relation to the canvas in Inkscape, which will automatically align it with your PCB design. Give it a visual check and make sure the SVG lines up with the Gerbers.

Step 10:
Once you've confirmed that the SVG is lined up correctly, go back to Inkscape and remove everything in the SVG except the text you added. Save that file with a slightly different name (text_only.svg) and load it into Bantam Tools Desktop Milling Machine Software, once again selecting "Scale From Document Bounds." This is the SVG file you'll be milling. You can remove the older SVG file from our software.
Step 11:
Once again, confirm that Bantam Tools Desktop Milling Machine Software’s preview looks correct. If you like, you can hide the Gerber file (by clicking the eyeball icon next to the file name) so that all you see is the SVG. You should see just the text and the canvas outline (which won’t be milled). Unhide the Gerber file.

Step 12:
Now you're ready to start milling the board! Make sure you’ve selected a 1/32" flat end mill for the Gerber files and a 80° engraving tool for the SVG.
Step 13:
Start by milling the SVG first. Physically insert the 80° engraving tool into the Bantam Tools Desktop PCB Milling Machine. Then click “Start Milling,” following all prompts. Wait a few minutes for this cut to complete.
Step 14:
Next, cut the Gerber files. Load the 1/32" flat end mill and click Start Milling. Bantam Tools Desktop Milling Machine Software will cut out the traces, pads, holes, and board outline.
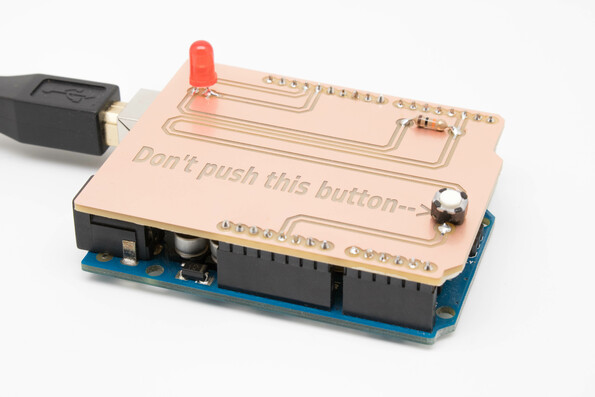
After this cut, your board is complete!