Using Digital Calipers Properly

Digital calipers are your best friend when it comes to taking accurate measurements of small objects. In order to take accurate measurements, it’s important to know how to use calipers properly. For Bantam Tools Desktop PCB Milling Machine users, calipers are downright indispensable for ensuring that your material dimensions in software are consistent with the material’s actual dimensions.
Most decent calipers are accurate to within +/-0.001" (0.02 mm), which is enough to make sure you don’t cut too deep when milling and to know that your design will fit within the piece of material you’re using. This guide demonstrates how to use digital calipers to take various measurements and is useful for anyone wanting to learn how to use them properly.
Why use calipers instead of a ruler?
In a word, accuracy. A ruler and your eyeball might be fine for many scenarios but not when it comes to making sure your machine mills at a depth of 0.003" and not 0.006" or 0.001". For instance, if the material thickness (Z-axis) measurement is higher than expected, then on the first cutting pass, the end mill will encounter more material than expected, which can dull or break the end mill. Alternately, if the material thickness (Z-axis) measurement is lower than expected, then the milling machine's cuts will not go deep enough.
Why use digital calipers instead of dial calipers?
It’s much easier to read digital calipers, and they’re often not any more expensive or less precise than dial calipers. Unless you’re really old-school or you just love dials, digital calipers are the way to go.
Anatomy of a Pair of Calipers

On/zero button: Turns on the calipers and sets the current position to zero
Thumbwheel: Opens and closes the jaws
Outside jaws: Measures the outside dimensions of an object
Inside jaws: Measures the inside dimensions of an object. These are delicate, so be careful.
Depth gauge: Measures the thickness of an object or the depth of a hole
Step gauge (not visible): Measures the distance from an edge to another point on an object
Locking screw: Prevents the caliper jaws from moving
Inch/millimeter button: Switches between inches and millimeters
ABS button: Temporarily sets the current position to zero
Battery compartment: Holds the battery
Your name: Tells people that these are your calipers. It’s important in shared workspaces!
Zero the Calipers Before Taking Measurements

It’s critical to zero your calipers before taking any measurements. If you skip this step, your subsequent measurements may not be accurate. In the animation above, the display reads -0.0025" when the jaws are first closed (inaccurate). The zero/on button is then pressed to set it to zero. The next time it’s closed, it reads 0.000", so it’s ready to take measurements. Some fancy calipers, like these ones, guarantee that the zero position will always be correct, but it’s still important to make sure.
Measuring Outside Dimensions
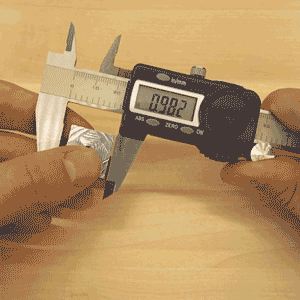
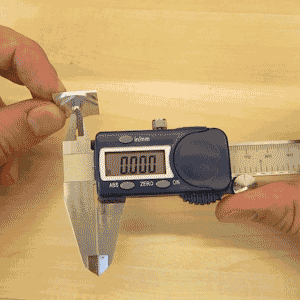
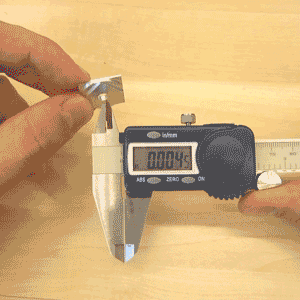
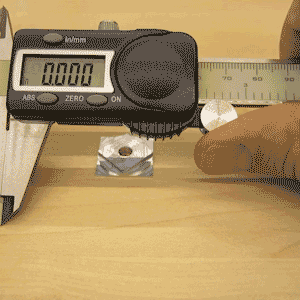
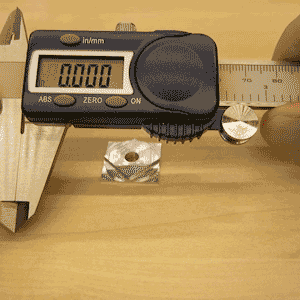
Use the outside jaws to measure the outside dimensions of an object. Make sure that the object is parallel to the jaws, or else the measurement won’t be accurate. In the animations above, the outside jaws are being used to measure the width of a piece of milled aluminum. The second animation is incorrect because the object being measured is not parallel to the jaws.
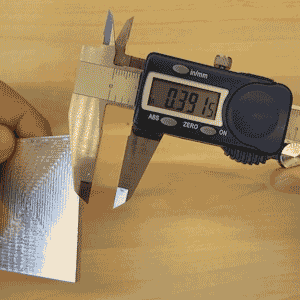
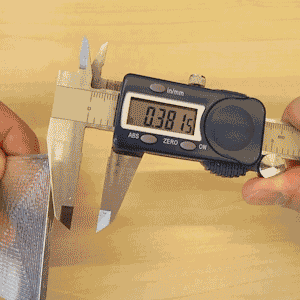
You can also use the outside jaws to measure the thickness of an object. For Bantam Tools Desktop PCB Milling Machine users, this is the most important measurement. Your material thickness needs to be accurate or your tool will cut too deep or not deep enough, as described above. Make sure the object is perpendicular to the jaws so the measurement is accurate. In the animations above, the outside jaws are being used to measure the thickness of a milled aluminum plate. The second animation is incorrect because the object being measured is not perpendicular to the jaws.
Measuring Inside Dimensions
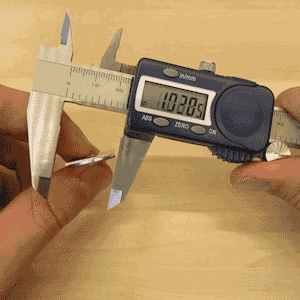
Use the inside jaws to measure the inside dimensions of an object. Make sure the object is perpendicular to the jaws. In the animations above, the inside jaws are being used to measure the inside dimensions of a hole milled into a piece of aluminum. The second animation is incorrect because the object being measured is not perpendicular to the jaws.
Measuring Depth
Use the depth gauge to measure the depth from one surface to the next. Make sure the calipers are perpendicular to the surface being measured. In the animations above, the depth gauge is being used to measure the distance from the surface of an aluminum part to the desk below it. The second animation is incorrect because the calipers are not perpendicular to the surfaces being measured.
Taking a Step Measurement

Use the step gauge to measure the distance between one edge and the next edge above it. In the animation above, the step gauge is being used to measure the distance from the corner of a milled part to the front edge of the square feature above it.
Taking Comparative Measurements

By zeroing the calipers in place when taking a measurement, you can compare the dimensions of one object to those of another. In the animation above, the diameter of a hole in a milled part is compared to the diameter of a rod to determine if the rod will fit into the hole. First, the inside jaws are used to measure the inside diameter of the hole. Next, the zero/on button is pressed to zero the calipers. Finally, the outside jaws are used to measure the outside dimensions of the rod. The reading on the screen is the difference between the dimensions of the hole and the rod.