Bantam Tools Software Updates: What's New in 2.2.7
The October 2020 (2.2.7) release of the Bantam Tools Milling Machine Software is now available and there are a lot of exciting things to cover: conversational CAM, additional PCB milling support, new automated probing routines, and more. Some of these new features are software subscriber only features while others are free to all users. Let’s dive in!
Conversational CAM
*Subscriber Feature*

Facing stock using built-in conversational CAM.
We’re excited to add conversational CAM to the list of features at your disposal in the Bantam Tools Milling Machine Software. Conversational CAM is a way to add simple toolpaths within the software without having to rely on an external CAD and CAM program. This is especially helpful when you’re just looking to perform simple operations. In this first instance of conversational CAM, we’ve added programs to allow you to quickly face stock or add holes to a part.
Surface Facing Toolpaths
Once you’ve measured your stock and loaded it into the Desktop CNC Milling Machine, head to the Initial Setup tab and click the purple New CAM button. In the pop-up window, you’ll be able to select Surface Facing or Hole. If you click on the Surface Facing toolpath, your real-time preview will update to show your toolpaths.
When you select a new tool in the Initial Setup tab, the toolpaths in the Bantam Tools software update based on the speeds and feeds for that tool. The speeds and feeds for the facing or hole toolpaths are based on the recipes in the Tool Library. Once you’ve selected your tool, the last thing to specify is the Facing Depth.The facing toolpath will automatically adjust to the dimensions of your stock, which you can input in the Material Setup tab.
Note: As an extra precaution, the Bantam Tools software builds in an additional toolpath around your stock in case the stock is not perfectly rectangular. This would prevent the first pass from being heavier than the rest.
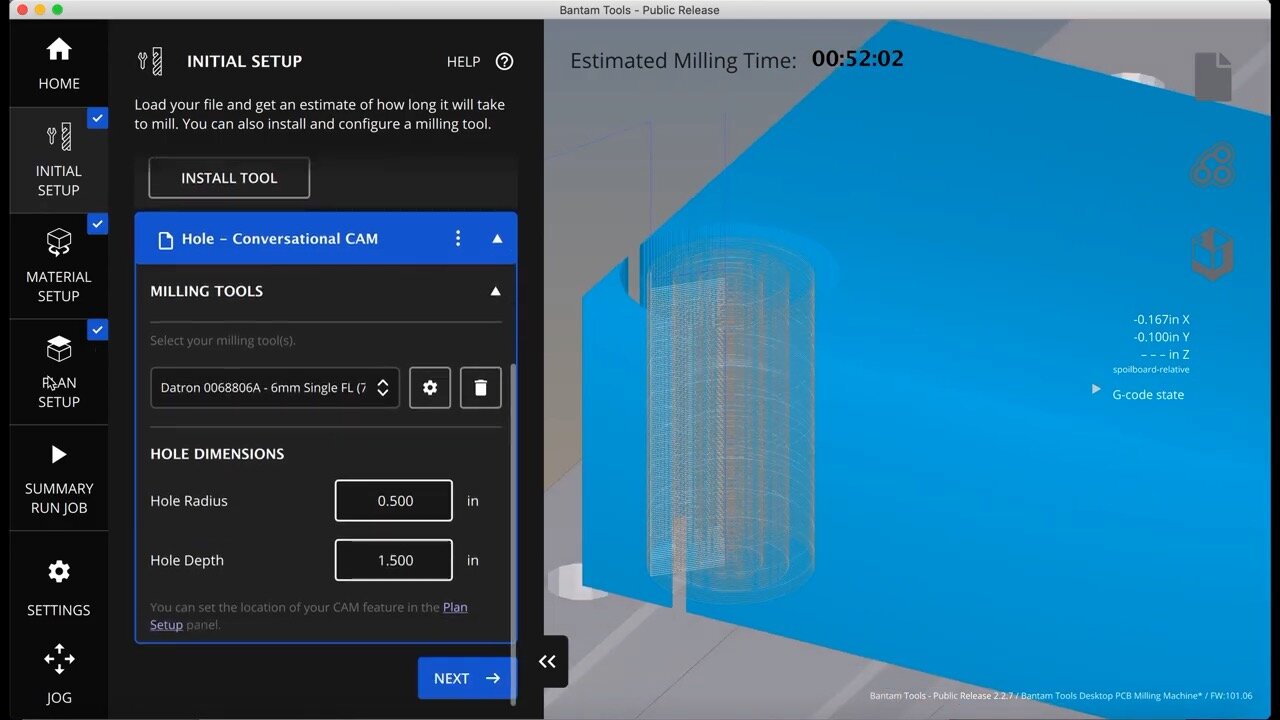
Realtime preview of hole toolpath with conversational CAM.
Hole Toolpaths
Just like with the Facing toolpath, when you select your tool, the real-time preview will update based on the speeds and feeds entered in the built-in Custom Tool Library. Then you just enter the radius and depth of the hole you want to machine.
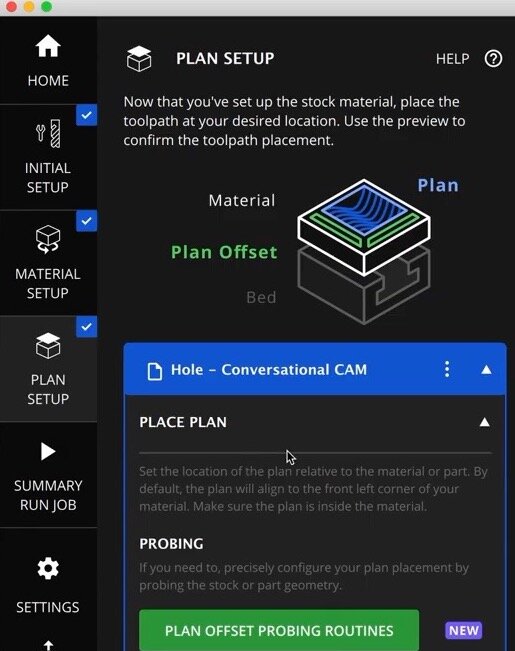
The hole placement defaults to the top, front, left corner of the stock.To adjust this, head to the Plan Setup tab. Here you have two options: Place the hole manually by entering the X, Y, and Z values or use the built-in automated plan placement probing routines. Click the Plan Offset Probing Routines button to launch one of the automated routines of your choosing. To learn more about utilizing the automated probing routines in the Bantam Tools software, check out our Material & Plan Placement Probing Routines support guide and video.
PCB Milling Support
*Subscriber Feature & PCB Milling Machine User Feature*
While the Desktop CNC Milling Machine is optimized for machining aluminum parts, we know many of you love making electronics with our CNC machines, and we're not going to stop empowering you to make circuit boards. With the base package of the Bantam Tools software, you can machine circuit boards using free Gerber to G-code solutions like FlatCAM. Software subscribers and Bantam Tools PCB Milling Machine owners have access to our built-in PCB milling workflow, which allows you to directly import Gerber files or EAGLE board files.
Loading Gerbers into the Bantam Tools software requires one additional step: When you go to import your file, the Bantam Tools software will show a pop-up window that will prompt you to point the first Gerber file you’ve selected to the next Gerber file you want to machine. If you’re working with EAGLE, the electronics workflow will be even faster. After you’ve designed your circuit board in EAGLE, simply go to the Initial Setup tab in the Bantam Tools software and import your .brd file.

Loading Gerber files into the Bantam Tools software.
Loading EAGLE files into the Bantam Tools software.
Whether you’re working with an EAGLE file or Gerber file, the real-time preview will update from blue to copper. To set up your file, you’ll need to select your tools. The speeds and feeds for the tools you select can be found (and customized) in the Custom Tool Library. You’ll also notice that in the Toolpaths dropdown menu, there are a number of PCB-specific settings that you can choose from.
Side to Mill: If you’re milling a double-sided board, you can toggle to select which side you want the Desktop CNC Milling Machine to mill.
Traces, Holes, and Outline: Toggle between these settings to choose which features of your circuit board you want to machine (depending on the layer you’re machining).
Trace Depth: This setting allows you to adjust the depth of your traces. We typically like to machine at 0.003”, but this may vary depending on your design.
Trace Clearance: This setting tells the Desktop CNC Milling Machine how much extra copper you want to clear away between the traces.
With PCB milling support in your arsenal, you’ll be able to machine both your circuit board and its enclosure using the Desktop CNC Milling Machine, just like we did for this sequencer synth project. Check it out!
Note: If you are a Desktop PCB Milling Machine user, EAGLE integration comes standard in the base package of your software because the mill is specifically designed for prototyping electronics!
Additional Updates
*All users feature update*
Helpful Graphics, Z-Height Offsets & Z Only Probing Routine
We noticed some confusion with early beta testers when configuring material and plan offsets. We've added two graphics—one in the Material Setup tab and another in the Plan Setup tab—to help illustrate how these offsets relate to one and another. You’ll also notice in the Material Setup tab that we’ve added a Z-offset input field. This is extremely helpful if you’re using parallels to lift your material off the T-slot bed or using double-sided Nitto to fixture your stock to the machine bed. The material probing routines will then take this offset into account and report back an accurate height for your material. We’ve also added a new automated Z-only Stock Probing routine to quickly check the height of your stock.


What features would like to see integrated into the Bantam Tools software? We’d love to hear from you. Feel free to reach out to us at resources@bantamtools.com.